Indoor Campfire Idea #1
Things You’ll Need
·
Rocks (wash them off first, so that they are clean)
· Brown craft or packing paper
·
Orange, red, and yellow tissue paper
Cut
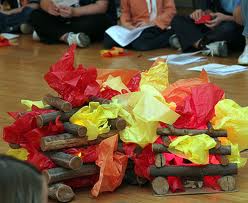
wide strips of craft paper. How big you make your strips depends on how big you want your "fire" to be, this one is
approximately 12cm by 18 cm. Crumple and squish strips to give them some texture, and then roll the strips into the
shape of logs.
Cut a few additional pieces of craft paper, and crumple them up into loose balls. Place
these crumpled balls in the centre of the area where you would like to build your fire, and lean your logs against the crumpled
ball, tepee style.
Arrange
clean rocks in a circle around the fire.
Indoor
Campfire Idea #2
Gather
enough rocks to make the fire ring. Clean them off before bringing inside. Rip up a brown paper bag and then twist the pieces
to look like firewood. You could use real twigs and sticks but paper is cleaner. Use scrap pieces of felt for the flames.
To make the flames, cut up yellow felt scraps (you could use a mix of colors) so that they were a bit like irregular triangles. Pull at the edges to soften the look. Arrange the rocks in a circle and build your
fire.
Indoor Campfire
Idea #3
This
Campfire Craft provides a campfire which is perfectly safe for children of all ages - and, even better, you can bring
it indoors if the weather lets you down!
When
you have it made, why not gather around and sing some campfire songs!
Things You’ll Need
·
4 Cardboard tubes (we used the inner tube from kitchen
towels)
· Brown paint
· Crepe paper in red, yellow and orange
·
Glue (optional)
Paint
your cardboard tubes brown and leave to dry. Arrange them into a rough pile. If you want to keep your campfire to use again
in the future, you can glue them into position.
Rip
up pieces of the crepe paper and scrunch into flame shapes. Push the flames into the pile of tubes.
Indoor Campfire
Idea #4
Things You'll Need
·
Black plastic trash bag
· Black dirt
· Pine cones
· Tree limbs, sticks or branches
· Rocks 6 to 12 inches in diameter
· Small fan, approximately 4 to 6 inches in diameter
· Red, orange and yellow cellophane
· Scissors
· Roll white gauze
· Masking tape
· Fire logs
· 4 to 7 small flashlights
·
Colander
Tear
a black plastic trash bag open so you have a large single sheet of plastic. Lay the plastic liner down where you want the
campfire. Cover the trash bag with a thick layer of black dirt. Form a rock circle to surround your fire using rocks that
are 6 to 12 inches in diameter. Toss pine cones and tree limbs, sticks or branches around the outside of the circle on the
dirt to add to the outdoor appearance.
Cut
red, orange and yellow sheets of cellophane into 12 strips ranging from 4 to 12 inches in length that resemble flames. Shred
four to six strips of white gauze that are 5 to 10 inches long, which will create faux smoke.
Turn
a small fan that is approximately 4 to 6 inches in diameter so that the fan is blowing upward. Tape one end of the cellophane
flames and gauze strips around the circumference of the fan rotating the two materials and varying the sizes.
Place
the fan in the center of the fire pit and lay two fire logs as close as you can to the fan, one on each side, so they are
parallel to each other. Add two more fire logs perpendicular to the first logs to form a square. Place logs in this fashion
until you have wood stacked above the fan, which will vary depending on the height of the fan.
Wrap
red, orange and yellow sheets of cellophane over the light cover of four to six small flashlights. Tape the cellophane around
the flashlights using masking tape. Insert the covered flashlights in between the fire logs and fan at varying angles toward
where the "flames" and "smoke" will rise.
Crumple
red, orange and yellow sheets of cellophane into balls and stuff these in the space between the logs and fan, concealing the
flashlights and fan from view to create fire embers.
Turn
the fan on low and turn the flashlights on. Create stars on the ceiling by flipping a colander upside down with an uncovered
flashlight lit beneath it. Place the colander at an angle against a nearby wall or prop it up so that the light shines on
the ceiling above the campfire. Alternatively, place the colander with the light underneath inside the rock fire pit, if you
feel it does not take away from the realistic campfire look.
Indoor Campfire Idea -
Fan the Flames
For
an elaborate setup, find a small fan that can be aimed to blow upwards-a computer fan or a small room fan works well. Anchor
the fan to a base and secure a row of red and orange blinking lights a few inches above the fan. You might attach the lights
to every other bar of a grill that's propped up above the fan with wooden blocks, to increase the area the light covers. To
increase the amount of reflection, wrap the grill prongs in aluminum foil or cover the wooden blocks in foil before attaching
the lights. On the bars without lights, attach material that will act like flames; fire-coloured silk is the best option.
Experiment with the shapes that will most closely resemble fire when the fan is turned on. To create the impression of fire,
turn the fan and the lights on; the blowing "flames" will glow dramatically with the light shining upward, particularly in
a dark room. For convenience, mount the entire setting in a shallow fire pan and run the light cord out the back.
Indoor Campfire Idea -
Glowing Embers
To
give the effect of the tail end of the fire, when the embers are glowing, use real logs and cellophane. Find a stack of campfire
wood, logs and sticks to make a real fire setup, and place crinkled-up red and orange cellophane under it, letting the edges
peek out. You might also wrap some of the smaller sticks in cellophane and allow them to lie underneath the setup. To create
a glow, curl up some red, orange, yellow or even white Christmas lights lay them underneath your fire setup and plug them
in. The light will reflect off the cellophane, creating "embers."
Indoor Campfire Idea -
Tissue Paper Fire
For
a less-complex fake campfire, find several small fans, then cut out strips of red, orange and yellow tissue paper and tape
them to the outside of the fans. To create a glow, use flashlights or standing lamps placed behind the fans. This type of
fake fire may require some manoeuvring to make the fans blow upward, and you may need to use a pile of campfire logs to disguise
the setup.
Campfire In a Bucket
For
this project, you will need a small play bucket or an empty plastic ice cream tub. Cut several sheets of yellow, orange and
red construction paper into fire shapes. Wash and dry the bucket. Tape the flame shapes to the bucket's outside with masking
tape loops. You can fill this campfire bucket with freshly microwaved popcorn for your family movie night. You can also fill
it with candy treats for special events or unit parties.
CD Campfire
Recycle an old CD and make this fabulous miniature campfire! This makes a perfect
gift for campers who love roasting marshmallows in the great outdoors.
What you'll need:
·
Old CD
· Rocks – about the size of a quarter
· Sticks
· A handful of soil, dirt or sand
· White craft glue
· Small scraps of red, orange and yellow tissue paper
·
Toothpick
How to make it:
·
Cover CD with glue and use a paintbrush or your finger to
spread the glue out for an even coat.
· Cover glue area with dirt or sand and tap off excess.
· Use your finger to push back a little of the dirt from the
edges, all the way around the CD, to make room for the
rocks.
· Squeeze out a generous amount of white glue onto the
cleared edge of the CD. Press a rock into the glue.
Repeat until entire rim of the CD is covered in rocks.
· If necessary, break sticks into approximately 4 inch
pieces. Using white craft clue, build a "fire" with the sticks
by laying them down in a teepee formation, gluing as you
go. Let everything dry for 2 hours (will not be completely
dry, but won't slide around).
· Tear tissue paper into small pieces, approximately 1" or
2" squares.
· Place tip of toothpick into the center (don't poke through)
of a piece of red tissue paper. Wrap the tissue paper
around the toothpick.
· Dab some glue on the tip and dip it into the sticks,
removing the toothpick once inserted. Repeat around the
top of the sticks with several red pieces and then add a
few orange toward the middle, and lastly one or two
yellow pieces at the top of the stick mound.
·
Let project dry completely overnight.
Tips:
·
To find sticks, especially in the spring, go to the base of
large
trees. Dead branches will break off from the weight
of the winter snow and from wind leaving several on the
ground for you to collect!
· If you don't have tissue paper, crepe paper streamers
work well. You may also use construction paper cut into
flame shapes.
· We do not recommend hot glue for this project. While the
rocks will stick well, they can easily pop off later on. White
glue will adhere much better so be sure
and plan for an
overnight dry time.
Moving Flames
Cut
a 4-inch by 11-inch strip of poster board. Paint both sides black. Shape the strip into a ring and tape it together on the
inside with a strip of black electric tape. Tape three strings across the rim witch clear adhesive tape. Tape yellow, orange
and read tissue paper strips or streamers to the strings. Lay a hand-held fan on the table with the blades facing up and turn
it on. Place your campfire ring on top of the running fan.
Paper Plate and Construction Paper Campfire
For
this project, you need a paper plate, construction paper, safety scissors, masking tape and a glue stick. Cut a few flame
shapes out of yellow, orange and red construction paper with the safety scissors. Cut a few strips from brown construction
paper. Stand the flame strips up on the paper plate. Attach them with strips of masking tape. Run the glue stick over the
brown construction paper strips. Arrange them on the paper plate around the flames.
Paper Towel Roll Centerpiece
Cut
three paper towel roll insides in half. Paint them brown with tempera paint or water colors. Wear an apron or an old shirt
when you use tempera paints, because not all tempera paints will wash out completely. Arrange them in a cardboard circle.
Place rocks gathered on a recent hike around the circle's edge. Paint the cardboard circle with black tempera paint or watercolors.
Tear or cut yellow, orange and red tissue paper into flame shapes and glue the shapes to the the paper towel logs.